The Autorouter
A simple point-to-point autorouter is integrated in Sprint-Layout. This autorouter is able to connect two points of your layout. These two points are defined with a connection (rubberband). The autorouter was not designed, to generate whole boards at once. This is usually not possible. To create a proper layout, you have to design it mostly by yourself.
The autorouter in Sprint-Layout is designed as an easy-to-use autorouter. You don't have to set obscure specifications and options. The autorouter is as simple as the whole software itself.
To use the autorouter, select the corresponding button in the left toolbar:

A small tool-window appears with the available options for the autorouter:
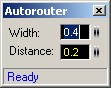
connection, the connection will be light up. With a simple click you can now "autoroute" this connection.
The autorouted track will be placed on the active layer. Make sure that the correct layer is activated.
The autorouter is searching for the shortest way to place the track. It takes care of the minimal distance between the elements on his way:
If the autorouter finds a way, the track will be created. Otherwise you will get a message in the tool-windows.
Autoroutes are indicated by an inner stripe. So you can distinguish between autorouted tracks and normal tracks.
Resolving an autoroute
You can resolve an autorouted track back to a connection. Just click on the autoroute, and you will get the original connection.
Edit an autoroute
You can also edit the autorouted track just like a normal track. You can adjust the width, move the corners, etc.
Tips for using the autorouter
If you have many connections to route, start to autoroute the shortest and easiest connections first. You may realize, that one autoroute is "blocking" some other good routes for other connections. Just resolve this autoroute and try the other connections first. Play with the sequence of the connections, to get the best results.
The autorouter can more likely find a route if you select a small track-width and a small distance. Try to change these values, if the autorouter fails to route a connection. Anyway you can edit autorouted tracks, if necessary.
Tüm devreyi tasarlayacak şekilde bit otomatik çizim özelliği mevcut değildir genelde kendiniz çizmeniz gerekecek.
A simple point-to-point autorouter is integrated in Sprint-Layout. This autorouter is able to connect two points of your layout. These two points are defined with a connection (rubberband). The autorouter was not designed, to generate whole boards at once. This is usually not possible. To create a proper layout, you have to design it mostly by yourself.
The autorouter in Sprint-Layout is designed as an easy-to-use autorouter. You don't have to set obscure specifications and options. The autorouter is as simple as the whole software itself.
To use the autorouter, select the corresponding button in the left toolbar:
A small tool-window appears with the available options for the autorouter:

connection, the connection will be light up. With a simple click you can now "autoroute" this connection.
The autorouted track will be placed on the active layer. Make sure that the correct layer is activated.
The autorouter is searching for the shortest way to place the track. It takes care of the minimal distance between the elements on his way:
- Elements on the active layer
- Drill-holes
If the autorouter finds a way, the track will be created. Otherwise you will get a message in the tool-windows.
Autoroutes are indicated by an inner stripe. So you can distinguish between autorouted tracks and normal tracks.
Resolving an autoroute
You can resolve an autorouted track back to a connection. Just click on the autoroute, and you will get the original connection.
Edit an autoroute
You can also edit the autorouted track just like a normal track. You can adjust the width, move the corners, etc.
Tips for using the autorouter
If you have many connections to route, start to autoroute the shortest and easiest connections first. You may realize, that one autoroute is "blocking" some other good routes for other connections. Just resolve this autoroute and try the other connections first. Play with the sequence of the connections, to get the best results.
The autorouter can more likely find a route if you select a small track-width and a small distance. Try to change these values, if the autorouter fails to route a connection. Anyway you can edit autorouted tracks, if necessary.
Tüm devreyi tasarlayacak şekilde bit otomatik çizim özelliği mevcut değildir genelde kendiniz çizmeniz gerekecek.
Son düzenleme: