PIC16F676 ile 7 Segment displayli 0 - 30 Voltmetre

guclusat

Tanınmış Üye
Süper Moderatör
PIC16F676-VOLTMETRE.gif

PIC16F676-Voltmetre-circuit.gif

Bu voltmetreyi 0 - 30 volt ayarlarlı adaptörlerinizde panelmetre olarak kullanabilirsiniz. Ölçüm aralığı 0 ila 30 volt arsındadır. PIC16F676 mikroişlemcisinin 10 bit adc özelliği kullanılarak yapılmıştır. Ölçüm sonucundaki voltajı led displaylerde görebilirsiniz. Devreyi montajladıktan sonra devre üzerindeki trimpottan kalibre etmeniz gerekir, kalibrasyondan sonra ölçüm yapacağınız kaynağa ölçüm uçlarından bağlayarak kullanabilirsiniz.

  1. 1 Adet PIC16F676
  2. 1 Adet 16 pin dip soket
  3. 3 Adet ortak anod display
  4. 3 Adet BC 557 TO92 NPN Transistör
  5. 1 Adet 78L05
  6. 8 Adet 100R direnc 1/4 watt ( Kahverengi - Siyah - Kahverengi )
  7. 2 Adet 1K direnc 1/4 watt ( Kahverengi - Siyah - Kırmızı )
  8. 1 Adet 47K direnç 1/4 watt ( Sarı - Mor - Turuncu )
  9. 1 Adet 5V1 zener 1/4 watt
  10. 1 Adet 47K Trimpot
  11. 1 Adet 100 nF kondansatör
  12. 2 Adet 0 numara 2' li klemens
  13. 1 Adet 10*5 bakırlı plaket

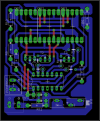
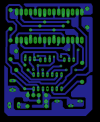
Devrenin pcb çizimi ( Direk kuşe kağıdına çıktı alıp ütüleyebilirsiniz )
Devrenin yerleştirme planı

PIC için gerekli HEX dosyası
 

Eklentiler

Başka bir siteden bulduğum baskı devre şemaları

devre şeması
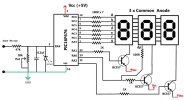
30v-volt-meter-with-pic16f676-schematic.jpg

You can find more about driving multiplexed 7 segment led display from a pic mcu in application note from microchip AN557 Four Channel Digital Voltmeter with Display and Keyboard. In my circuit the refresh rate is about 50hz.

Voltage Divider Front End
As you can seen in the schematic the 47k resistor and 10 k trim pot is connected ias a voltage divider configuration. We all know very well that by default pic micro controller ADC reference voltage is set to vcc(+5v in this case). So what we have to do is make such voltage divider that can divide out maximum range 30 volts to 5 volts. So we need is Vin/6 ==> 30/6 =5v voltage divider. And to keep as less as possible attenuation on the under test voltage we have to keep the voltage divider resistor value in few thousand ohms because it takes very little current from the target but as much to drive adc of pic.

Calculations
10bit adc resolution we get 1023 maximum count
with 5 v reference we get 5/1023 = 0.0048878 V/Count
means if the adc count is 188 then input voltage is 188 * 0.0048878 == 0.918 volts

Now with the voltage divider the maximum voltage is 30v so the calculations will be 30/1023=0.02932 volts/count
if now we get 188 then 188*0.02932=5.5 Volts

You can also increase or decrease the range by changing resistor network and the calculations a little bit.

The capacitor 0.1uf makes the adc input a bit stable because 10bit adc is really sensitive. The 5.1v zener will provide over votage protection to the internal adc because it wont allow voltage more than 5.1v.

Accuracy and calibration
Overall accuracy of this circuit is great but it totally depends on the values of 47K resistor and 10k trim pot. As fine as you can go by adjustment of the trim pot your accuracy goes fine.

Calibration of this circuit is done by adjustment of the 10k trimpot around value of 7.5k or so. All you have to do is take any standard power like 5v or 12v and apply that to the input of the resistor network and adjust the trimpot until you get correct value on the display.
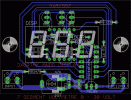
 

Eklentiler

  • 30v-volt-meter-with-pic16f676-pcb.png
    30v-volt-meter-with-pic16f676-pcb.png
    16,9 KB · Görüntüleme: 45
  • 30v-volt-meter-with-pic16f676-pcb2.png
    30v-volt-meter-with-pic16f676-pcb2.png
    11,3 KB · Görüntüleme: 44
3 Digits Digital Volt Meter

This is simple 3-digits digital volt meter.PIC16F676 used to read analog signal(voltage) and display the value on 3-digits 7-segment. You can apply to measure DC currant with parallel Rshunt but I’m not descript here.

Hardware

3-digits-Digital-volt-meter-300x235-300x235.jpg


As we know the most of PIC microcontroller has 8-bit/10-bit on-chip Analog to Digital converter module. In this project I use PIC16F676 which have ADC 10-bits 8 channel but this project use only one channel for measure voltage input for other pin set as digital I/O.

Schematic

3-Digits-Digital-Volt-Meter.gif


From the schematic above the input voltage divided by R1 and R2 (voltage divider).VR1 parallel with R2 use to adjust appropriate display full scale voltage.The divided input voltage will connected to AN3(RA4) which set as analog input.

RA0,RA1 and RA2 set as digital output to turn on/off the digits in scan dispay routine.
RA3 not use in this version and it was input only
RC0-RC5 and RA5 use to drives the segment of dispay(7-segment decoded by software)

Software

This project I use CCS C compiler to programming.The main routine continually read the input voltage on RA3 and convert to 7-segment code while TIMER1 set to timer for interrupt every 5mS for scan all digit about 66Hz(only one digit turn on at every 5mS).In convert digital value to voltage routine we must scale the value with the full scale display in this project I want full scale display at 30V so the input voltage must scaled with 30 and display resolution is 29mV or 30/1023. Source code and schematic available here.

Download source code and schematic.
 

Eklentiler

Geri
Yukarı