This unit would be mounted in a small plastic or preferably metal box, with a 9V battery, level control, a male XLR connector (same as on a mic) and a switch. Current drain is low, since the circuit only uses one low power dual opamp. There is no requirement for a high quality device, and an LM358 is all that is needed. You can use other opamps if preferred, but make sure that they are designed to operate with supply voltages of ±2.5V to ±8V or so. The LM358 has the advantage of a wide supply range and very low cost, and guarantees that the circuit will still function as the battery discharges.

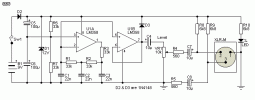
Figure 1 - Mic Circuit Test Oscillator
The first stage is the oscillator itself. This is a simple opamp based three stage phase shift oscillator - a circuit that was remarkably uncommon when this project was first published. At the time, I had never seen it used elsewhere. I designed it for another project a few years ago, and I could never understand (at the time) why it was not more common. Phase shift oscillators using valves and transistors have been used in their millions, but not so for opamps. Fast forward 16 years or so and the situation is very different.
If you want to tune it, you can use a 50k pot instead of R1. I suggest that if tuned, set it to A-440 Hz. Frequency stability is not wonderful, and it changes by a few Hertz as the battery discharges, but this is unlikely to cause problems - it is a test oscillator, not a tuning standard. As shown, frequency will be about 430Hz, depending on the accuracy of the capacitors.
The phase shift network (R1-C1, R2-C2 and R3-C3) serves two purposes. First (and for an oscillator, most importantly), it shifts the phase of the output signal so the feedback is positive, causing oscillation. Secondly, since it is a three stage low pass filter, it attenuates the signal and filters the output square wave so the signal at pin 2 is a reasonable sine wave. Distortion (if you really care) is about 5% or so - I didn't measure it this time, but I recall having done so before.
The second stage is the output buffer, and the signal is simply split to supply the two mic leads. The metal case should be connected to pin 1 (earth) on the XLR connector. The output level control must be a linear type, as the circuit loading will create a good approximation to a log pot. Maximum output into a typical microphone input will be about 100mV (unloaded oscillator output on mine was 140mV).
Not much to it - the whole circuit can be built on a small piece of Veroboard, and the battery, pot and XLR connector will take up far more room than the oscillator. The LED indicator shows that power is on, and it must be a high brightness type as the current is deliberately limited to around 1mA. To prevent accidentally turning it on, a slide switch is suggested. They are a pig to mount compared to a toggle switch, but are much less easily bumped. If you can get a pot with a switch, this would be even better, but these are now hard to get - especially as linear.
Make sure that you do not connect any of the internal circuit to the case. As shown, the unit will be quite happy on phantom powered (48V) mic lines - this will not be true if you connect any part of the circuit to to the case (pin 1 of the XLR). A phantom powered version is shown next and it will be happy with +48V or battery operation.
Phantom Powering
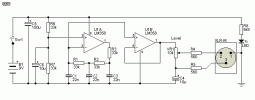
There will be cases where it's preferred that the oscillator is phantom (48V) powered. The opamp is a low power device, and will only draw typically 1-2mA for the two opamps, so that's a relatively easy option to add. The circuit is shown below. The oscillator and buffer are the same as shown in Figure 1, but there are several additions and some changes needed to make it work with phantom power. It's no longer a fully balanced circuit, because phantom power requires that pin 1 is used because that's the DC return path. The LED indicator shows that phantom power is available (provided the switch is in the 'off' position of course). The LED will show that the battery is on when the oscillator is not connected to a mic cable or phantom power is turned off.

Figure 2 - Phantom Powered Mic Circuit Test Oscillator
The most obvious additions are the two 6.8k resistors and additional blocking capacitors (C4 has been moved, C7 and C8 added). The zener is used to protect the circuit from over-voltage, and D1 has been added to prevent the 12V supply from trying to charge the battery. With most normal alkaline batteries, charging them is likely to lead to leakage of their bodily fluids, and that's not something anyone wants.
The blocking caps (C7 and C8) need to be rated for 63V so they can withstand the full 48V, although they won't get that in normal use. D3 protects the opamp's output from potentially damaging voltage transients from the phantom power. While the current is limited at the mixer end, the mic cable forms a capacitor that will charge to the full 48V, and the stored charge can wreak havoc if it's not catered for. The oscillator will run immediately when phantom power is applied - the switch is only needed to turn on the battery for non-phantom tests.
Figure 1 - Mic Circuit Test Oscillator
The first stage is the oscillator itself. This is a simple opamp based three stage phase shift oscillator - a circuit that was remarkably uncommon when this project was first published. At the time, I had never seen it used elsewhere. I designed it for another project a few years ago, and I could never understand (at the time) why it was not more common. Phase shift oscillators using valves and transistors have been used in their millions, but not so for opamps. Fast forward 16 years or so and the situation is very different.
If you want to tune it, you can use a 50k pot instead of R1. I suggest that if tuned, set it to A-440 Hz. Frequency stability is not wonderful, and it changes by a few Hertz as the battery discharges, but this is unlikely to cause problems - it is a test oscillator, not a tuning standard. As shown, frequency will be about 430Hz, depending on the accuracy of the capacitors.
The phase shift network (R1-C1, R2-C2 and R3-C3) serves two purposes. First (and for an oscillator, most importantly), it shifts the phase of the output signal so the feedback is positive, causing oscillation. Secondly, since it is a three stage low pass filter, it attenuates the signal and filters the output square wave so the signal at pin 2 is a reasonable sine wave. Distortion (if you really care) is about 5% or so - I didn't measure it this time, but I recall having done so before.
The second stage is the output buffer, and the signal is simply split to supply the two mic leads. The metal case should be connected to pin 1 (earth) on the XLR connector. The output level control must be a linear type, as the circuit loading will create a good approximation to a log pot. Maximum output into a typical microphone input will be about 100mV (unloaded oscillator output on mine was 140mV).
Not much to it - the whole circuit can be built on a small piece of Veroboard, and the battery, pot and XLR connector will take up far more room than the oscillator. The LED indicator shows that power is on, and it must be a high brightness type as the current is deliberately limited to around 1mA. To prevent accidentally turning it on, a slide switch is suggested. They are a pig to mount compared to a toggle switch, but are much less easily bumped. If you can get a pot with a switch, this would be even better, but these are now hard to get - especially as linear.
Make sure that you do not connect any of the internal circuit to the case. As shown, the unit will be quite happy on phantom powered (48V) mic lines - this will not be true if you connect any part of the circuit to to the case (pin 1 of the XLR). A phantom powered version is shown next and it will be happy with +48V or battery operation.
Phantom Powering
There will be cases where it's preferred that the oscillator is phantom (48V) powered. The opamp is a low power device, and will only draw typically 1-2mA for the two opamps, so that's a relatively easy option to add. The circuit is shown below. The oscillator and buffer are the same as shown in Figure 1, but there are several additions and some changes needed to make it work with phantom power. It's no longer a fully balanced circuit, because phantom power requires that pin 1 is used because that's the DC return path. The LED indicator shows that phantom power is available (provided the switch is in the 'off' position of course). The LED will show that the battery is on when the oscillator is not connected to a mic cable or phantom power is turned off.
Figure 2 - Phantom Powered Mic Circuit Test Oscillator
The most obvious additions are the two 6.8k resistors and additional blocking capacitors (C4 has been moved, C7 and C8 added). The zener is used to protect the circuit from over-voltage, and D1 has been added to prevent the 12V supply from trying to charge the battery. With most normal alkaline batteries, charging them is likely to lead to leakage of their bodily fluids, and that's not something anyone wants.
The blocking caps (C7 and C8) need to be rated for 63V so they can withstand the full 48V, although they won't get that in normal use. D3 protects the opamp's output from potentially damaging voltage transients from the phantom power. While the current is limited at the mixer end, the mic cable forms a capacitor that will charge to the full 48V, and the stored charge can wreak havoc if it's not catered for. The oscillator will run immediately when phantom power is applied - the switch is only needed to turn on the battery for non-phantom tests.
Eklentiler
Son düzenleme: