ESP8266-01Smart Relay for Home Automation
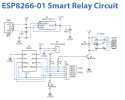
Smart Relay Circuit

ESP8266-01 Code
Kod:
#include <ESP8266WiFi.h>
const char* ssid = "Circuits DIY";
const char* password = "03433212601";
int RelayPin = 2; // GPIO2
WiFiServer server(80);
void setup()
{
Serial.begin(115200);
delay(10);
pinMode(RelayPin, OUTPUT);
digitalWrite(RelayPin, LOW);
// Connect to WiFi network
Serial.println();
Serial.println();
Serial.print("Connecting to ");
Serial.println(ssid);
WiFi.begin(ssid, password);
while (WiFi.status() != WL_CONNECTED) {
 delay(500);
 Serial.print(".");
 }
 Serial.println("");
 Serial.println("WiFi connected");
  // Start the server
  server.begin();
  Serial.println("Server started");
  // Print the IP address
  Serial.print("Use this URL to connect: ");
  Serial.print("http://");
  Serial.print(WiFi.localIP());
  Serial.println("/");
}
void loop() {
  // Check if a client has connected
  WiFiClient client = server.available();
  if (!client) {
    return;
  }
  // Wait until the client sends some data
  Serial.println("new client");
  while(!client.available()){
  delay(1);
  }
  // Read the first line of the request
  String request = client.readStringUntil('\r');
  Serial.println(request);
  client.flush();
  // Match the request
  int value = LOW;

  if (request.indexOf("/RELAY=ON") != -1)  {
    digitalWrite(RelayPin, LOW);
    value = LOW;
  }
  if (request.indexOf("/RELAY=OFF") != -1)  {
    digitalWrite(RelayPin, HIGH);
    value = HIGH;
  }

  // Return the response
  client.println("HTTP/1.1 200 OK");
  client.println("Content-Type: text/html");
  client.println(""); //  do not forget this one
  client.println("<!DOCTYPE HTML>");
  client.println("<html>");
  client.println("<h1>IoT Smart Relay</h1>");
  client.println("<h4>www.Circuits-DIY.com</h4>");
  client.println("<img src=\"https://static.thenounproject.com/png/731364-200.png\">");
  client.println("<br>");
  client.print("Relay Pin is now: ");
  if(value == LOW) {
    client.print("On");
  } else {
    client.print("Off");
  }
  client.println("<br><br>");
  client.println("<a href=\"/RELAY=ON\"\"><button>Turn On </button></a>");
  client.println("<a href=\"/RELAY=OFF\"\"><button>Turn Off </button></a><br />");
  client.println("</html>");
  delay(1);
  Serial.println("Client disonnected");
  Serial.println("");
}
Steps to Install ESP8266 NodeMcu In Arduino IDE
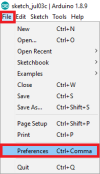
Arduino IDE'de ESP8266 NodeMcu Kurulum Adımları- Navigate to File> Preferences in your Arduino IDE.

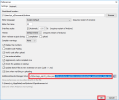
- As indicated in the picture below, enter http://arduino.esp8266.com/stable/package esp8266com index.json into the “Additional Boards Manager URLs” section. Then press the “OK” button. If you already have the URL for the ESP32 board, separate the Links with a comma.

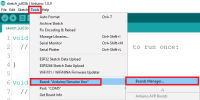
- Navigate to Tools > Boards Manager.

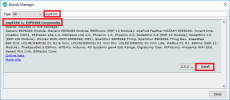
- Search for ESP8266 and click the “ESP8266 by ESP8266 Community” install button.

- That’s all. Within a few seconds, it will be installed.
Uploading the Code
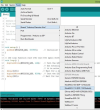
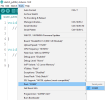
- Because it includes a built-in programmer, posting the sketch is quite straightforward. Connect the board to your computer. Check that you have the correct board chosen.

- You must also pick the correct Port.

- In the Arduino IDE, click the “Upload” button and wait a few seconds until you get the message “Done uploading.” in the lower left corner.
Son düzenleme:
